|

Do Mountain Bikes Get Scratched? Tips To Minimize Scratches and Chips

Do Mountain Bike Get Scratched Featured Image

If you’re an avid mountain biker, you know that scratches and chips on your bike are inevitable.

Yes, mountain bikes get scratched all the time. When riding on rough terrains or encountering obstacles, the bike’s frame, fork, and other components may come into contact with rocks, branches, or other abrasive surfaces, leading to scratches.

But fear not, there are ways to minimize the damage and keep your mountain bike looking pristine for longer.

Below, I’ll share some tips and tricks on how to prevent and minimize scratches and chips on your mountain bike.

From investing in a protective kit to proper maintenance and cleaning techniques, you’ll learn how to keep your bike looking as good as new.

Why Do Mountain Bikes Get Scratched?

Mountain bikes can get scratched for several reasons. The main reason for scratches is the dangerous and challenging terrain they navigate, where branches, rocks, and overgrown shrubs can leave unsightly marks.

Transporting the bike can also lead to accidental bumps and scrapes.

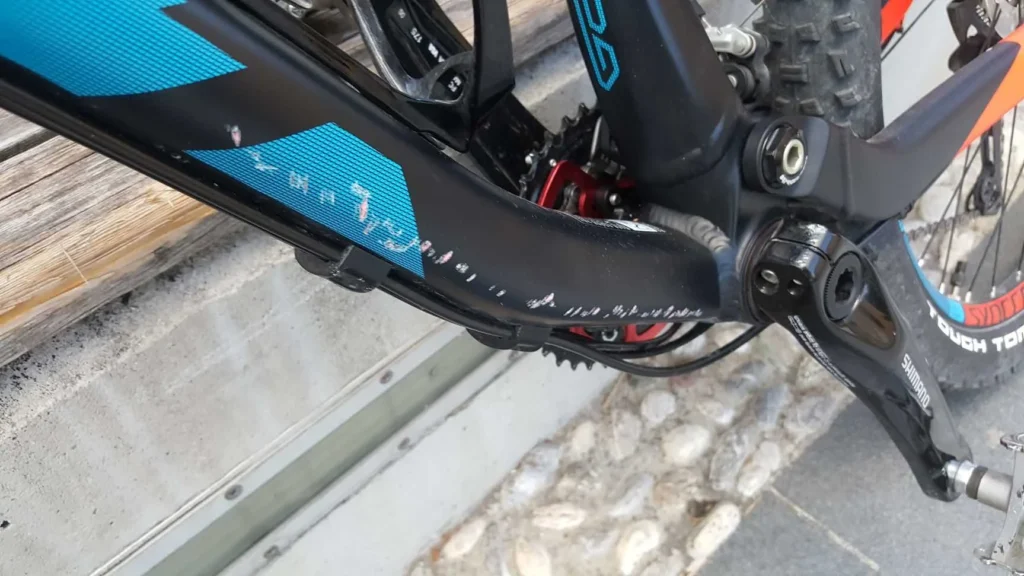
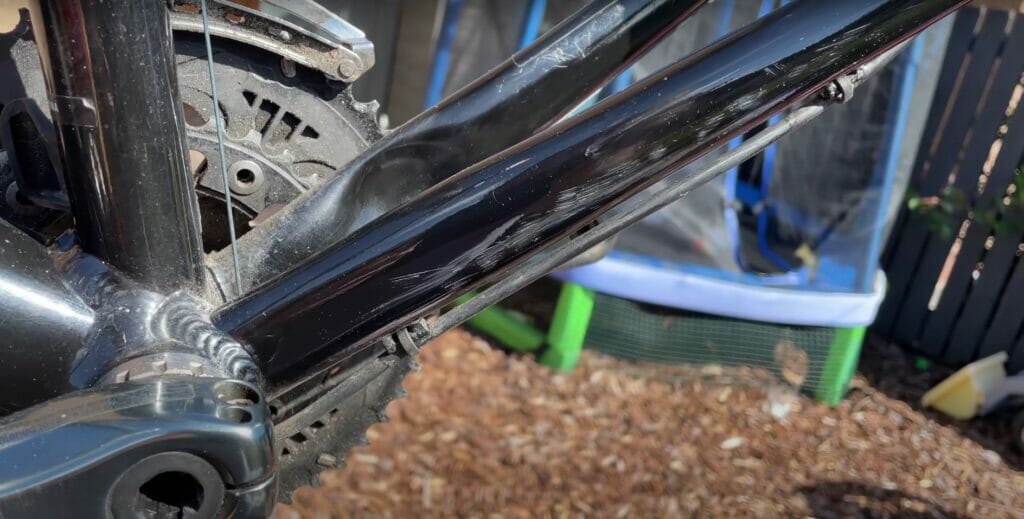
As I washed my bike, I kept finding paint chips and scratches everywhere.

There were two big paint chips near the rear dropout where my derailleur had smashed into the frame after it broke

Scratched mountain bike frame

When thinking about why these marks form over time when you’re out having fun riding your bike, it’s important to recognize that bikes are meant to be used.

Wear and tear can happen from some of the harshest conditions or a simple crash in a parking lot.

Even so, these chips and scratches are battle scars earned while pushing our machines to their limits in search of adventure.

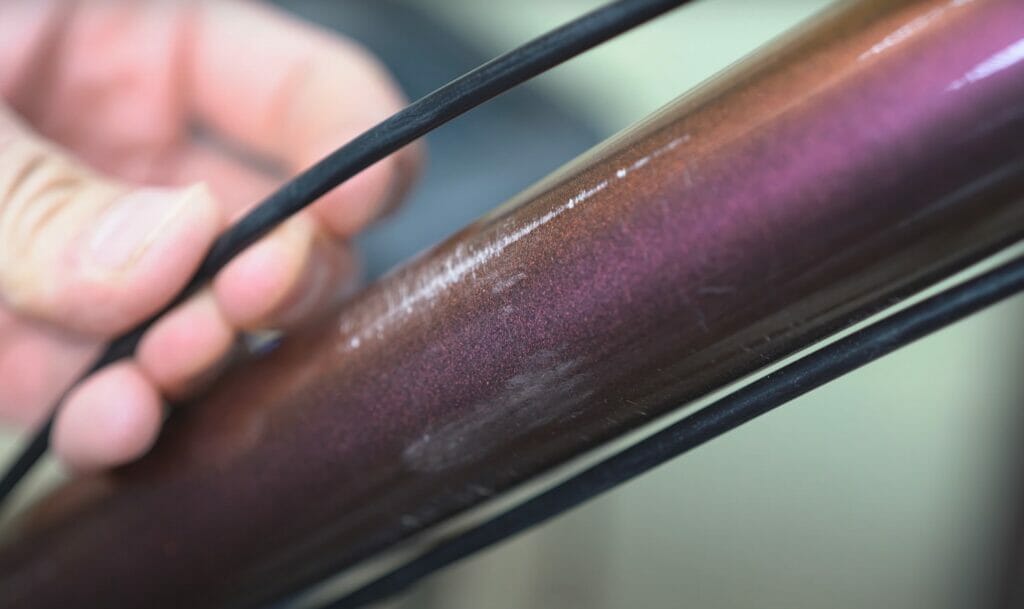
Types of Bike Scratches

Scratches are an inevitable reality in the mountain biking realm.

These marks can range from minor surface scratches to deep dents that compromise the structural integrity of the frame.

Understanding the different types of bike scratches can help riders better assess the extent of damage and take appropriate steps to address them.

  • Light Scratches: These are shallow marks that only affect the top layer of paint or coating on the bike frame. They are usually caused by minor contact with branches, rocks, or other trail obstacles. While these scratches may not be a cause for concern in terms of functionality, they can still detract from the bike’s overall appearance.
  • Deep Scratches: These are more significant marks that penetrate deeper into the frame, potentially exposing the underlying material, such as carbon fiber or metal. Deep scratches can occur from more forceful impacts or collisions, and they may require professional inspection and repair to ensure the bike remains safe to ride.
  • Paint Chips: Paint chips are small, circular areas where the top layer of paint has been completely removed, often leaving a visible spot on the bike’s base material. These chips can result from sharp impacts or repeated friction against rough surfaces. While they may not affect the bike’s performance, they are more noticeable and can be a source of frustration for owners who strive for a flawless paint job.
  • Cosmetic Imperfections: These are minor aesthetic flaws, such as scuffs or blemishes, that do not affect the integrity of the frame. They can be caused by various factors, including general wear and tear, improper storage, or accidental contact. These won’t impact ride quality, but they can still be an eyesore for those who prefer a pristine bike.

From simple touch-up paint for light scratches to more extensive repair services for deep scratches, there are various options available to restore the bike’s appearance. We will explore these methods at the end of this article.

Are Scratches and Chips Safe for Carbon Frames?

Carbon frames are incredibly lightweight and strong, thanks to the use of carbon fiber materials.

However, they are also more vulnerable to impact compared to other frame materials like aluminum or steel.

Even light scratches or chips on a carbon frame can weaken its structural integrity, leading to potential failure over time.

To ensure the safety and longevity of your carbon frame, it is crucial to get any scratches or chips inspected by a professional.

They usually inspect carbon frames using an electronic digital tap hammer. This is the same tool used by technicians in the aerospace industry.

These guys will assess the depth and severity of the damage and determine whether any underlying structural issues need to be addressed.

Ignoring these seemingly minor imperfections can result in catastrophic failure while riding.

Preventing Scratches and Chips on Mountain Bikes

Preventing scratches and chips on your mountain bike is essential for both its appearance and longevity.

Here are some ways to minimize scratches on your bike:

  • Investing in frame protection
  • Proper storage
  • Paint job
  • Practicing regular cleaning and maintenance

Below we will explore each of these preventative measures so you can enjoy your mountain biking adventures while keeping your bike safe from unnecessary damage.

1. Investing in Frame Protection

Investing in frame protection is a wise choice to prevent scratches and chips on your mountain bike. There are various options available:

Frame Protection Stickers

These stickers are made of high-quality adhesive PVC to cover susceptible areas of the frame and provide an extra layer of protection. They have a unique look and feel and can withstand impact and cable rubbing.

They come in many cool graphics and designs that can improve the look of your bike frame protection while adding a personal touch to it. Apply it from day one to keep your bike frame scratch-free.

DyedBro has a wide range of stickers for different kinds of bikes, frames, and parts.

Frame Protection Kits

Frame protection kits (bike protection films) are comprehensive sets of protective materials and accessories that are designed to safeguard vulnerable areas of a bike frame from scratches, scuffs, stone chips, and other forms of damage.

Using a frame protection kit, like one from RideWrap, is an affordable and effective way to keep your mountain bike frame looking new and maintain its resale value.

RideWrap bike frame protection kit

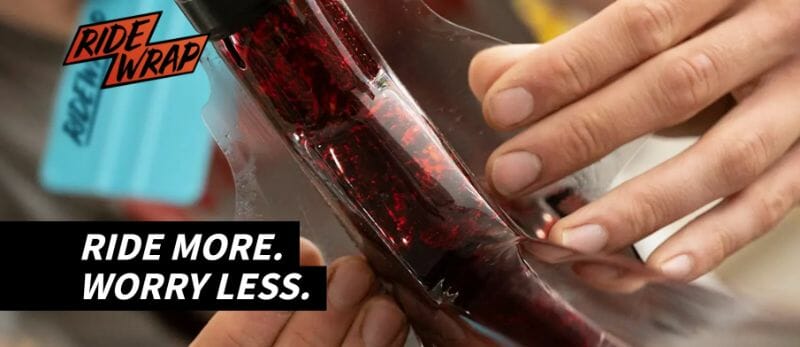
Here are some of the frame protection kit benefits:

  • Coverage: Frame protection kits come in different levels of coverage, from basic to total. Basic kits protect specific areas like the downtube, chainstays, and seatstays, while total protection kits safeguard the whole frame, including the fork.
  • Self-Healing: Bike frame protection film is often self-healing, meaning that it can repair minor scratches and marks on its own over time. This feature helps to keep your bike frame looking new and well-maintained.
  • Durable: The protection films are made from high-quality materials that are resistant to impact, abrasion, and cable rubbing. These materials are often self-healing, meaning they can repair minor scratches and marks on their own over time.
  • Pre-cut Pieces: Many frame protection kits come with pre-cut pieces that are specifically designed to fit different bike models and sizes. These pre-cut pieces ensure a precise and seamless fit, providing maximum coverage and protection
  • Easy to Install: Bike frame protection film is easy to install and can be done at home with minimal tools and expertise. Most films come with detailed instructions and installation accessories to facilitate the process
  • Custom / Brand-specific Options: Different brands offer their own frame protection kits with unique features and designs. Some brands, like RideWrap, offer tailored protection kits that are custom-made for specific bike models, providing industry-leading coverage and protection.
  • Cost-Effective: Bike frame protection film is an affordable option to protect your bike frame from scratches and damage. It’s a one-time investment that can save you money in the long run by maintaining the resale value of your bike.

2. Proper Storage & Transporting

man reaching up for a bike in neat and organized storage

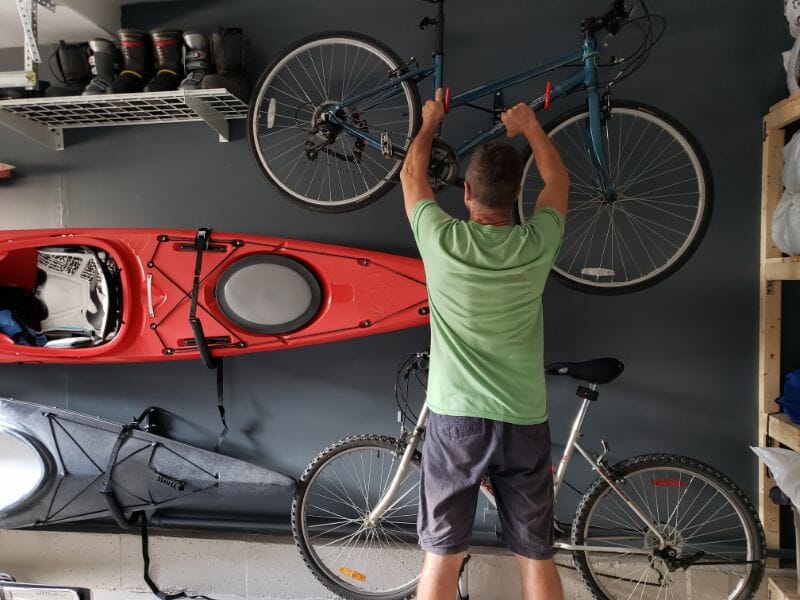
To keep your bicycle in top shape and protect it from scratches and damage, proper storage and transportation are vital.

  • Find a dry and secure spot to store your bike, away from moisture and extreme temperatures.
  • Avoid areas exposed to direct sunlight. For transportation, invest in a sturdy bike rack and use protective covers and padding.
  • Ensure your bike is securely fastened with straps or bungee cords, checking that all components are firmly attached.

3. Paint Job

Having a top-notch paint job is a must for any mountain bike. It’s not just about looks, but also about safeguarding against scratches and harm.

Gloss and matte paint are the two main options commonly used.

Gloss Paint

Glossy paint is a top choice for mountain bikes because of its amazing qualities and long-lasting nature. This type of paint gives your bike a shiny and reflective finish that adds depth and dimension to its look. The glossy surface creates an illusion of depth, making the colors vibrant and eye-catching.

In terms of durability, glossy paint can withstand the elements and resist minor scratches and scuffs. It’s often paired with a clear coat for extra protection against UV rays and to enhance its durability.

However, glossy paint does have its drawbacks. Over time, it may fade due to prolonged exposure to sunlight and other environmental factors. It’s also more prone to chips and cracks compared to matte paint because the smooth surface reflects light and makes imperfections more noticeable.

Below is a recap of gloss paint’s pros and cons:

Pros

  • Shiny and reflective finish
  • Enhances the appearance of your bike
  • Easier to clean and maintain
  • More durable and scratch-resistant

Cons

  • More prone to showing scratches and imperfections
  • More difficult to touch up
  • Can be more expensive than matte paint, as it requires more coats and a higher level of finish

Matte Paint

Matte paint has gained popularity in the mountain biking community due to its distinct non-reflective finish and classy appearance.

Unlike glossy paint, matte paint has a flat surface that doesn’t reflect light, making it great at hiding imperfections and scratches on the bike frame. However, maintaining matte paint is not easy.

It is porous and easily absorbs oils, sweat, dirt, and other impurities, making it challenging to clean. Moreover, it is prone to staining and wear over time. Restoring the look of a matte-painted mountain bike is no walk in the park.

Regular cleaning methods won’t cut it, and using harsh cleaners can further damage the paint. Specialized matte cleaning products are necessary to effectively clean and maintain the bike frame without compromising its unique matte appearance.

Below is a recap of matte paint’s pros and cons:

Pros

  • Non-reflective finish that can give a unique and understated look
  • Less prone to showing imperfections and scratches
  • Easier to touch up than gloss paint

Cons

  • More difficult to clean and maintain as it is more prone to trapping dirt and grime
  • Less durable and scratch-resistant due to its softer surface
  • More difficult to find and can be more expensive than gloss paint, as it requires a higher level of finish and expertise

4. Regular Cleaning & Maintenance Routine for the Bike

To keep your mountain bike in top shape, you need to clean and maintain it regularly.

  • Start by giving it a thorough wash with warm, soapy water and a brush, paying extra attention to hard-to-reach spots.
  • Once clean, inspect key components like tires, chains, and brakes for any signs of wear or damage.
  • If the chains are rusty, make sure to clean them first.
  • Apply lubricant to keep everything running smoothly. Don’t forget to tighten any loose bolts and regularly check and adjust gears for seamless shifting.

Simple maintenance like this will extend its lifespan and enjoy the optimal performance on every adventure.

Removing Existing Scratches from Mountain Bikes

While some cyclists may wear these marks as badges of honor, others prefer to keep their bikes looking as pristine as possible.

Luckily, there are ways to remove or minimize existing scratches on your mountain bike to restore its original appearance.

Use Superglue To Fill in the Scratches

Using superglue is a great method to fix scratches on your bike. It’s a simple and affordable way to make your bike look better and prevent more damage.

To start, apply a small amount of superglue directly on the scratch. Then, use your finger or a cloth to spread the glue over the scratch until it fills the gap and becomes even with the surrounding paint.

It has a clear finish, making it ideal for cosmetic damage. But if you want the repair to be even less noticeable, you can add a layer of nail polish or car urethane paint over the superglue.

This will help match the color and texture of the surrounding paint, making the repair blend in seamlessly.

Shoe Polish and Sand Paper

One effective method to fix scratches on a mountain bike is by using shoe polish and sandpaper.

Here’s a step-by-step guide on how to do it:

  • Thoroughly clean the scratched area of the bike frame to expose the damage. Use a mild detergent or bike-specific cleaning product and a soft cloth or sponge to remove any dirt, grease, or debris. Make sure to wipe it dry afterward.
  • Choose a darker shoe polish color that closely matches the color of your bike frame. Apply a small amount to the scratch and spread it evenly over the damaged area. Be generous, as it has a soft consistency that helps fill in the scratches.
  • Take a fine-grit sandpaper, around 600 or 800 grit, and carefully rub the surrounding areas of the scratch. Use gentle strokes to level the surface and ensure that it blends in well. Be mindful not to apply too much pressure, as you don’t want to damage the surrounding paint.
  • After sanding, take a clean soft cloth or microfiber towel and buff the area to assess the results. The shoe polish should have filled in the scratches and the surface should be smoother.

Urethane Auto Paint

Urethane auto paint is durable and long-lasting, making it perfect for protecting your bike frame from more scratches or damage. It is also a great way to hide existing damage on a frame.

  • To start, sand the damaged area to smooth out any rough edges. This will create a better surface for the paint to stick to. Make sure to clean the area well to get rid of any dust or debris.
  • Next, apply a primer that is made specifically for bike frames. This will help the paint stick and give a smooth base for the color. Let the primer dry completely before moving on.
  • Now it’s time to mix and spray the urethane auto paint on the damaged area. Follow the instructions from the manufacturer for the right ratios and techniques. Apply several thin coats for a smooth and even finish.
  • After the paint is applied, check for any drips or spots and fix them. If there are any imperfections, lightly sand them down and spray another coat of paint.

Candle Wax

Did you know that candle wax can be an effective solution for removing light scratches from your mountain bike?

Here’s how you can use candle wax to remove those pesky scratches:

  • Start by lighting a candle and allowing it to burn for a short time. This will cause liquid wax to form on the surface.
  • Once the wax has melted, carefully pour a small amount onto the scratched area of your bike frame.
  • Use a clean cloth or sponge to spread the liquid wax evenly over the scratch. Make sure to cover the entire damaged area.
  • Allow the wax to cool and harden completely. This will usually take a few minutes.
  • Once the wax has hardened, use a plastic card or your fingernail to gently scrape off any excess wax from the surface. Be careful not to scratch the surrounding areas.

It’s important to note that this method works best for light and shallow scratches. For deeper or more severe cosmetic damage, it may not be as effective.

In such cases, it’s recommended to seek professional assistance or consider other methods for repairing the scratches on your mountain bike.

Nail Polish

Nail polish is a handy tool that can disguise those annoying blemishes on your bike frame.

It’s not only cheap but also comes in a wide range of colors, so finding a shade that matches your bike’s paint job is a breeze.

  • Start by thoroughly cleaning the scratched area with soap and water to ensure proper adhesion.
  • Then, apply a thin layer of nail polish directly onto the scratch using the brush provided. For deeper scratches, multiple coats may be necessary, allowing each layer to dry completely.

This won’t provide the same level of protection as professional solutions, but it’s a quick and easy fix to make your bike look better until you’re ready for a more comprehensive repair. 

Toothpaste

If you want to find a surprising solution to remove scratches from your mountain bike, you might be amazed by what toothpaste can do.

  • Start by thoroughly cleaning the scratched area to ensure the toothpaste works its magic.
  • Once it’s clean and dry, take a dry paper towel and apply a small amount of toothpaste. Gently rub the toothpaste onto the scratched area using circular motions, covering the entire surface.
  • Apply some pressure and keep buffing for a few minutes to let the toothpaste work its wonders.
  • Then, wipe away the toothpaste residue with another clean paper towel. You’ll soon notice those scratches fading away. If they’re still visible, simply repeat the process with a fresh application of toothpaste.

Toothpaste is best for mild scratches, so consult a professional or try a dedicated bike frame paint kit for deeper damage.

Frequently Asked Questions

Yes, it is normal for bikes to get scratched over time. Scratches can occur due to regular use, accidents, or when the bike is not handled with care. However, taking preventive measures such as using protective covers or parking in designated areas can help minimize scratches.

To protect your bike from scratches, consider using a protective cover when not in use. Additionally, you can apply a clear coat or protective film to the frame to prevent scratches. Regularly cleaning and maintaining your bike can also help keep it scratch-free.

To make a bike scratch-proof, you can apply a protective coating or film to its surface. Additionally, using bike frame protectors or wraps can help prevent scratches from occurring. Regular cleaning and maintenance can also help maintain the bike’s appearance and reduce the risk of scratches.

Yes, you should take action to prevent the chip from getting worse. A small chip in a carbon fiber bike frame can potentially lead to more significant damage over time, so it is advisable to repair it or seek professional assistance to ensure the integrity of the frame.

To remove a paint scratch on a black bike at home, start by cleaning the area with soap and water. Then, apply a thin layer of touch-up paint that matches the color of your bike. Finally, gently buff the area with a soft cloth to blend the paint and make the scratch less visible.

Toothpaste can be used to remove light surface scratches on a bike. Its abrasive properties help to gently polish the scratched area, but it may not be effective for deep or severe scratches. It is recommended to test a small area first before applying toothpaste to the entire scratched surface.

Scratched rims can be a cause for concern as they can lead to further damage and affect the overall appearance of your vehicle. It’s recommended to address the issue promptly to prevent any potential issues in the future.

Similar Posts